Pa Resource
Manager - FAQ
Installation
1. I
downloaded the complete setup (PRMSetup.ZIP). What am I
expected to do now?
2. I downloaded the executable and help (PRM.ZIP)
file. What am I expected to do now?
3. I downloaded the empty database (PRMEmpty.ZIP) file. What am I expected to do
now?
4. A message
appears, telling me that the file it tries to install is not
newer than the one I already have. What should I do?
5. How do I uninstall
PRM?
Usage
1. How can I import
styles into PRM database?
2. What is a bank and how can I
make one?
3. How can I move styles to my Pa?
4. How
can I move styles to my Pa (2.4 added features)?
I
downloaded the complete setup (PRMSetup.ZIP). What am I expected
to do now?
WARNING:
I've had problems with PRM 2.4 complete setup, still unsolved.
So remember that complete setup will install PRM 2.3 version.
You'll need to download PRM.ZIP file and expand it inside your
PRM folder, so that PRM.EXE and PRMHelp.chm files will be
updated.
PRMSetup.ZIP
is a compressed file: please expand it inside a folder, open that
folder, locate a file called setup.exe
and run it, so that installation procedure starts.
The
installation procedure is very fast and easy. All you have to
do is confirm the default installation folder or choose
another one.
Wait for
installation procedure ending, then remember to copy the empty
database inside PRM installation folder (or wherever you like);
then click on START / PROGRAM
/ RicFreak Soft / PRM / PRM 2.3 to run
the application.
(Back to Top)
I
downloaded the executable (PRM.ZIP) file. What am I expected
to do now?
PRM.ZIP is
a compressed file: please expand it in a folder and open that
folder. You will find two files called PRM.EXE and PRMHELP.CHM.
All you have
to do now is copy those files to your original
PRM installation folder. Please remember to save old
PRM.EXE and PRMHELP.CHM before overwriting them with this new
version: if
something goes wrong with latest version, you can restore the
previous one.
Now
run PRM and look at the top of main window to see if version
number is properly changed (to be sure of correctness of the
update procedure) (Back to Top)
I
downloaded the empty database (PRMEmpty.ZIP file. What am I expected
to do now?
PRMEmpty.ZIP
is a compressed file: please expand it in a folder and open
that folder. You will find a file called PRMEmpty.MDB, an empty
(without data) copy of PRM database.
You will need this
file if you are a first time installer, because complete setup
won't install any database file, to avoid unexpected
overwriting. And you can use
it to start multiple database copies (don't know, PRM1.MDB for
KORG Original styles and PRM2.MDB for self made styles, or
whatever), switching between them via the Parameter option
inside main window.
I strongly think that
you should use one database only, with all your styles inside:
sort and filtering options are what you need to work on styles
subsets. (Back to Top)
A
message appears, telling me taht the file it tries to install
is not newer than the one I already have. What should I do?
This is a frequent problem, shared by
all the programs in this site. Please refer to Support
Page, Setup Messages section.
How
do I uninstall PRM?
There are two ways for this task:
First: click on START
/ PROGRAM / RicFreak Soft / PRM and you
will see the Unistall option: click on it and follow the
instructions.
Second: open
Windows Control Panel (START / SETTINGS / CONTROL
PANEL), choose the Add/Remove
Programs option, search for
PRM inside the list, click on it, then on the uninstall button
and follow the instruction. (Back to Top)
How
can I import styles into PRM database?
From the style form, click
on the [Import from Folder] button. This screen will appear:
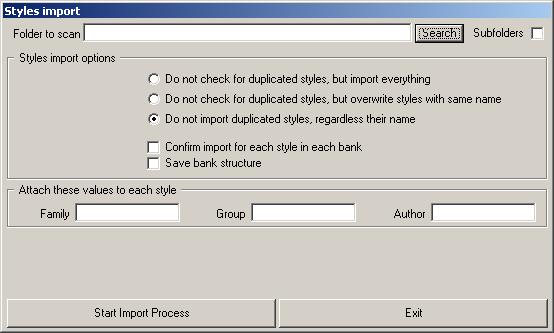
First,
you need to provide the path to the folder where STY
files can be found. This can be accomplished by
manually inserting the folder path in the Folder
to scan text box, or searching for the import folder
with a click on the Search
button.
Remember
to check the Subfolders
box if PRM should explore any
subfolder (at any level) of the previously given folder.
Then
you have to set the Styles
import options, following these rules:
-
check
the Do not check for
duplicated styles, but import everything box if you
want import any founded style, ever, without checking for
duplicated styles;
-
check
the Do not check for
duplicated styles, but overwrite styles with the same name
box if you want import any founded style, ever, but
overwriting styles with the same name;
-
check
the Do not import
duplicated styles, regardless their name box if you
want not to import already present styles.
-
check
the Confirm import for
each style in each bank box if you want to directly
decide what to import. PRM will stop after each bank read
completion, will show you the bank content and will let
you decide what to do (see the following picture; please
note the Family, Group
and Author text
boxes, for additional informations).
-
check
the Save bank structure box
if you want to save each readed bank along with its styles.
Finally, you can fill the Attach
these values to each style text boxes, so that each
imported style will have those values attached (as already
said, these values can be edited for each bank if the Confirm
import for each style in each bank option is checked).
After the import process
termination, PRM will ask you for log file display. If you
choose Yes a new window
will appear, reporting all the import activities. Press ESC
to close the import log window. (Back to Top)
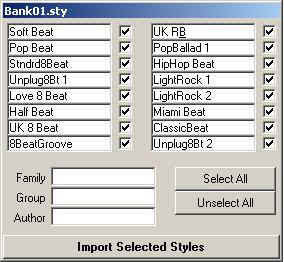
What
is a bank and how can i make one?
You should
be familiar with the bank concept, 'cause it is used by KORG
itself. Anyway, a bank is a set of styles (from 1 to
16). When you press one of the styles button on the left of
your key board, you are selecting a bank and its styles.
PRM can
automate the bank building during the import process, if you
checked the Save bank
structure box.
So, let's
have a look at the style window:
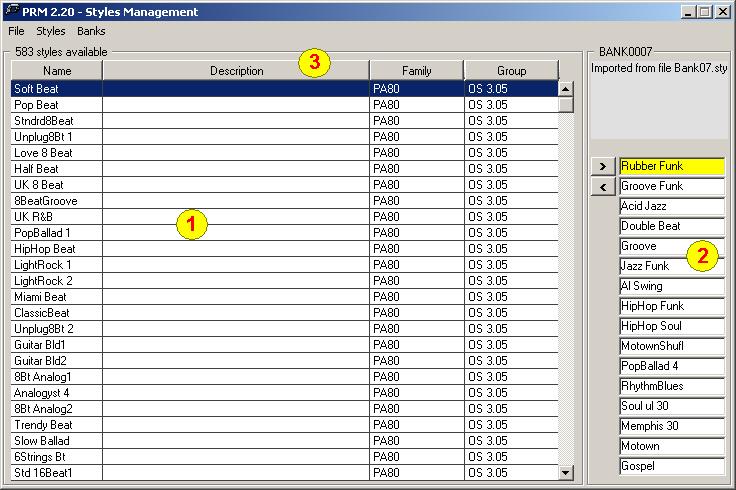
It
shows the styles stored inside your database in
1 and the styles
grouped in a bank in
2 (forget about
3 now). To
make a bank you have to select one or more styles (in the
picture the style Soft Beat is selected) and move them to the
bank buffer using the
>
button. Styles order inside the bank buffer can be changed;
moreover, styles can be removed
from the bank buffer using the
< button.
Remember
that a bank is a logic set: styles are linked to the bank, not
stored in it. So,
when you delete a style from a bank you won't delete the style
from your database.
Banks can be
updated, saved, deleted and used to build .STY file, to be
used on your Pa. Please refer to Bank menu for a list of
available options. (Back to Top)
How
can I move styles to my Pa?
Well,
to be honest, this is an impossible task. A style can't be
saved to a .STY file, because a .STY file contain a bank, that
is a set of a variable number of styles (from 1 to 16), with
additional informations.
Hence,
the first thing to know is how to build a bank of styles. If
you aren't familiar with this task, please learn
how to do it.
So,
from the styles window, press F4
or click Bank menu and Load
bank choice: the following window will appear:
Let's
assume that you want to save BANK0003
to a .STY file. You have different roads to follow to
accomplish this task.
-
From the bank load window
With
this option you can only save the bank for DIRECT
mode access to a floppy disk (DIRECT
FD) or inside your PA
hard disk (DIRECT
HD,
if you have an USB interface and if you have
properly configured
PRM
parameters). After you choosed the bank, click on:
-
To
DIRECT FD
button and the bank name will appear into the DIRECT
FD
white boxes (inside yellow rectangles) on the upper right
corner of the window;
-
To
DIRECT HD
button and the bank name will appear into the DIRECT
HD
white boxes (inside cyan rectangles) on the right side of the
window;
You
can store up to three
banks in DIRECT
FD
buffer
and up to nine
banks in DIRECT
HD
buffer
(buffer
means temporary
memory).
When
you are done, press the:
-
Make
button to produce a floppy disk that your PA will read
pressing its DIRECT
FD
button.
-
Transfer
button to move selected bank to DIRECT
HD
folders of your Pa hard disk.
If
you change your mind about the banks to save, click on the Clear
button to erase temporary buffers.
WARNING
Latest
Pa operating systems (1.05
for Pa60 and 3.05
for Pa80) reads DIRECT
HD
folders during the boot process. Hence, it will not recognize
any external change to DIRECT
HD
folders and files. Moreover,
accessing DIRECT
HD
styles during PRM
DIRECT HD
styles transfer may lead to an error.
So,
as long as KORG won't fix this problem (probably never!), this is the correct procedure to
follow:
1)
Turn on your Pa and don't touch anything
2)
Transfer up to nine banks to DIRECT
HD
folders
3)
Power off your Pa
4)
Wait a little
5)
Power on your Pa and enjoy it (and its freshly loaded DIRECT
HD
styles)
Please
remember that if you access your Pa DIRECT
HD
folders from your PC (via USB), your board won't read them
anymore (a read
error message
will appear) until you turn its power off and back on again.
-
From the style window
Click
on Load selected style bank
button. PRM will go
back to styles window and the selected bank will appear in the
right part of that window. Now click Bank
menu and Make .STY file
choice (or press F5).
The following window will appear:
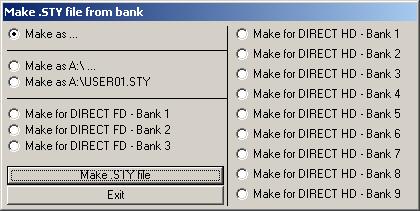
where
you can choose between different options:
Make
as ... to save the .STY file anywhere you like, with
the name you choose
Make
as A:\... to save the .STY file to floppy disk, with
the name you choose
Make
as A:\USER01 to save the .STY file to floppy disk, with
the name USER01.STY
Make
for DIRECT FD - Bank 1 to save the .STY file to a
DIRECT FD floppy disk as USER01.STY
Make
for DIRECT FD - Bank 2 to save the .STY file to a
DIRECT FD floppy disk as USER02.STY
Make
for DIRECT FD - Bank 3 to save the .STY file to a
DIRECT FD floppy disk as USER03.STY
Make
for DIRECT HD - Bank 1 to save the .STY file to your Pa
first DIRECT HD folder as USER01.STY
Make
for DIRECT HD - Bank 2 to save the .STY file to your Pa
first DIRECT HD folder as USER02.STY
Make
for DIRECT HD - Bank 3 to save the .STY file to your Pa
first DIRECT HD folder as USER03.STY
Make
for DIRECT HD - Bank 4 to save the .STY file to your Pa
second DIRECT HD folder as USER01.STY
Make
for DIRECT HD - Bank 5 to save the .STY file to your Pa
second DIRECT HD folder as USER02.STY
Make
for DIRECT HD - Bank 6 to save the .STY file to your Pa
second DIRECT HD folder as USER03.STY
Make
for DIRECT HD - Bank 7 to save the .STY file to your Pa
third DIRECT HD folder as USER01.STY
Make
for DIRECT HD - Bank 8 to save the .STY file to your Pa
third DIRECT HD folder as USER02.STY
Make
for DIRECT HD - Bank 9 to save the .STY file to your Pa
third DIRECT HD folder as USER03.STY
Note
that you cannot select more that one style at a time; this
means that building a complete DIRECT
FD floppy is a three step process, and reprogramming
nine DIRECT HD banks of
your Pa is a nine step process. Both are much longer and
tedious than the previous.
Remember
that .STY files made without the DIRECT
options should be loaded inside your Pa USERxx
banks to be played, while .STY files made with the DIRECT
options can be directly accessed pressing Pa
DIRECT FD button
or enabling Pa DIRECT
HD mode. (Back to Top)
How
can I move styles to my Pa (2.4 added features)?
PRM
2.4 added support for configurations. A configuration is
the name I choosed for the whole set of styles that your Pa
can manage: 19 banks of standard styles, 3
banks of DIRECT FD styles and 9 banks of DIRECT
HD styles: a total count of 31 banks, that is 496 styles (to
be honest, banks of styles can be stored inside the flash card
too, but I ignored this option. Maybe, in the future...)
So,
another way of moving styles to your Pa is building a
configuration and moving it to your board. Let's look at this
picture:
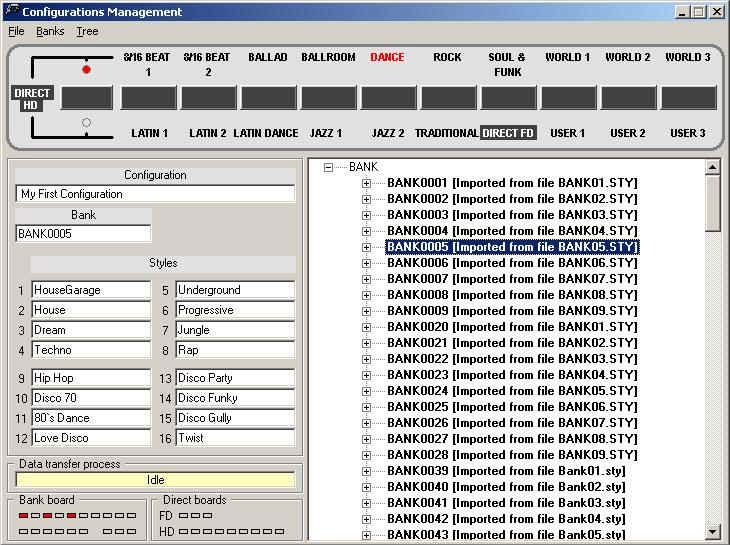
This
window will let you manage the whole set of styles that can be
loaded inside your Pa as a single entity.
First,
there are three important zones in this window:
-
the
upper part, wich is very similar to real Pa styles
selection board. This should be used to select banks (and
styles) destinations (let's call them slots);
-
the
left-lower part, where configuration content, bank content
and styles name can be specified; please note the Data
transfer process
message box (where messages about data transfer progress
will be displayed) and the Bank
board and Direct
boards indicators (to
have a fast and punctual view about your configuration,
free slots ecc.);
-
the
right-lower part, where banks and/or styles can be viewed
and selected in a treeview fashion.
So, how
can you define a configuration? Just type a description inside
the Configuration
box, and double click a bank in the right tree (banks are
written in black): the bank name will appear inside the Bank
box, and all the styles linked to that bank will populate the
sixteen Styles
boxes with the styles names. But, if you prefer, you can move
single styles from the tree to the desired place simply
dragging and dropping them (styles are written in blue). In
both cases, style names can be changed (without affecting
original styles name) simply typing inside the Styles
boxes. Moreover, you can use the Tree
menu choiche to load the tree with styles grouped in banks (default)
or with styles only, without bank grouping.
When
you are ready with first slot, you
can select another slot (using the upper style selection board),
store another bank in it, changing its content and so on. Please note that each used
slots is now turned to red inside Bank
board and Direct
boards.
When
you are done (that is when you have moved data to the desired
slots), choose the Save
option of File
menu (or press F8)
and your configuration will be saved to PRM database.
Configurations
can be loaded, modified, updated, and deleted; banks can be
renamed and deleted, and styles can be renamed, but their
original name (both for banks and for styles) can be restored.
There's no need
to move data to each slot. A configuration can store just a single
style.
Ok, now
one (or more) configuration is ready: how can I move these
data to my keyboard? Well, it is absolutely easy: just click
the Transfer
Data option of File
menu (or press F5).
Here is what will happen:
-
PRM
will duplicate all data of resource folder to a temporary
folder.
-
PRM
will start reading all the styles and banks of your
configuration, and moving those data to the temporary
folder (activity messages will be showed inside the Data
transfer process yellow box).
-
When
the build process is done another window will appear,
asking where configuration data has to be written:
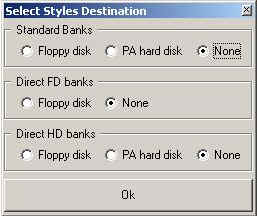
You
are free to decide which data will be written and where (of
course, PA
hard disk options will be
disabled if Pa hard disk path is not defined).
With
the USB card, you'll need only a floppy disk for DIRECT FD
styles; if you haven't the USB card, you will need 8 floppy
disks:
-
5
floppy disks for Standard Banks (#1 to #5)
-
1
floppy disk for DIRECT FD banks (#6)
-
2
floppy disks for DIRECT HD banks (#7 and #8)
Now
click on Ok
button to start moving data to selected destinations.
When
the process is done leave your PC and directly use your board:
-
for
Standard
banks: press Disk
button, go to Util
1 page, press Restore
Data button, press Enter
or Exit
buttons in order to restore data from
floppy disks or from
hard disk, press Enter
to confirm the restore process and wait until the process
completes (wait until DISK
IN USE led will go
off).
-
for
DIRECT
FD banks: nothing
special to do, just use DIRECT FD floppy as usual
-
for
DIRECT
HD banks: if data has
been written directly to your Pa hard disk, you
should turn it off and on again,
or those data cannot be accessed; if data has been written
to floppy disks, you have to follow a three step process:
load first three banks from floppy #7 to user slots, then
save them to Pa hard disk folder named !123; then load
three more banks from floppy #7 and save them to !456
folder; then load three more banks from floppy #8 and save
them to !789 folder: your DIRECT HD banks have been
correctly loaded, and can now be accessed as usual.
Just to give you
an idea about the time needed for moving a configuration to the keyboard:
Without
USB card
On
PC side you'll need about 1 minute to prepare configuration data and
about 8 minutes to write data to floppy disks (1 minute each).
On
Pa side you'll need about 5 minutes to restore data from floppies, and
about 6 more minutes to load and save user banks to DIRECT HD banks.
Total
needed time for 31 banks of styles is something between 20
and 25 minutes.
With
USB card
On
PC side you'll need about 1 minute to to prepare configuration data, and
only few seconds to move those data to Pa hard disk (but you'll still
need 1 minute for DIRECT FD floppy).
On
Pa side you'll need less than 1 minute to restore data from hard disk,
but you'll have to power the board off and on again for accessing DIRECT
HD banks.
Total
needed time for 31 banks of styles is less than 5 minutes.
|

